Wednesday, August 27, 2008

How to implement Threading in C#.NET?

What is Threading?

A Thread is an independent execution path for a code that can run concurrently with other execution paths i.e. other threads. All threads within a single application are logically contained within a Process – the operating system unit in which an application runs.. Application performance can be improved by executing multiple code paths simultaneously i.e. executing multiple threads simultaneously. This phenomenon of executing multiple threads simultaneously is called as Multi-threading. Multi-threading is often used in applications to enhance the application performance. Usually multiple threads that are executed are independent of each other to enhance the performance by reducing dependencies.

C# supports multi-threading of applications. A C# programs (let’s consider a console application) starts in a single thread created by the CLR and the OS i.e. the “main” thread. Then user can invoke multiple threads from this main thread to create a multi-threaded application. Let’s consider the example given below:

C# Threading Example:


using System;
using System.Threading;

namespace ThreadingSamples
{
class Program
{
static void Main(string[] args)
{

Program pg = new Program();
Thread thread = new Thread(new ThreadStart(pg.Fun));
thread.Name = "Thread_1";
thread.Start();

Thread.CurrentThread.Name = "Main_Thread";
pg.Fun();

Console.ReadLine();
}

public void Fun()
{
Console.WriteLine(Thread.CurrentThread.Name);
}
}
}


Output:


In the above given sample C# code, the main thread is invoked (also called as spawned) by the CLR. In the main thread we have created another thread called “Thread_1” and invoked the thread using the thread.Start() method. Note that we need to include the System and System.Threading namespaces for implementation of threading in C#. A separate copy of the variables in the “Fun” method is created for each thread (which resides on each threads memory stack). We have created an object of “ThreadStart”. Basically ThreadStart is a delegate that invokes the method supplied to it. In this example we have invoked a method “Fun” that does not accept any arguments. But if we want to call a function that accepts arguments then we have to use ParameterizedThreadStart instead of ThreadStart. The threads can be named, as we have named the thread “Main_Thread” and “Thread_1”.

How Threading Works in C#?

Multithreading is managed internally by a thread scheduler, a function the CLR typically delegates to the operating system. A thread scheduler ensures all active threads are allocated appropriate execution time, and that threads that are waiting or blocked such as on an exclusive lock, or for user input do not consume CPU time. Usually time-slicing mechanism is used to schedule the thread execution.


What is a Thread Safe Function?

A method/function that can ONLY be executed by a Single thread at a time is called as a Thread Safe function. The function “Fun” that we have seen in the above code sample is not thread safe, since any number of threads can access/execute this function simultaneously. When we talk about a thread safe function, the question arises- Why do we require a thread safe function? A thread safe function is required usually when we share variables across threads such as static variables or when we want that an object should be manipulated by a single thread at a time to maintain the data integrity. Let’s see an example of Thread Safe function…

C# Thread Safe Function:


class Program
{
static void Main(string[] args)
{

Program pg = new Program();
Thread thread = new Thread(new ThreadStart(pg.Fun));
thread.Name = "Thread_1";
thread.Priority = ThreadPriority.Normal;
thread.Start();

Thread.CurrentThread.Name = "Main_Thread";
pg.Fun();

Console.ReadLine();
}

public void Fun()
{
// The C# “lock” statement will lock the execution of the thread
lock(sync)
{
Console.WriteLine(Thread.CurrentThread.Name);
}
}
}

In the above sample code, the C# “lock” statement is used to lock the execution of the block when one thread is executing it. This means that ONLY one thread at a time can enter this Lock block for execution. Any other thread trying to enter will have to wait until the first thread completes its execution. Thus in this way we can make a function as a thread safe function. This can even be achieved by using Semaphores, Mutex etc. We do set priorities for threads in execution. Various values for thread priority are AboveNormal, BelowNormal, Normal, Highest, and Lowest.

Hope this helps you! Your comments are always welcome !

What is Cohesion and Coupling?

Cohesion of a single component is the affinity between different units of the module. High cohesion is expected during designing application architecture.

Coupling between components is their degree of mutual interdependence. Low coupling is expected during design application architecture. Low coupling makes components behave as plug-n-play devices.

  • size: Number of connections between routines
  • intimacy: The directness of the connection between routines
  • visibility: The prominence of the connection between routines
  • flexibility: The ease of changing the connections between routines

Following are the types of Cohesion observed during the design phase:

  • Coincidental Cohesion: (Worst) Module elements are unrelated.
  • Logical Cohesion: Elements perform similar activities as selected from outside module.
  • Temporal Cohesion: Operations related only by general time performed (i.e. initialization() or FatalErrorShutdown()).
  • Procedural Cohesion: Elements involved in different but sequential activities, each on different data. This can be divided into several functions as required.
  • Communicational Cohesion : Unrelated operations except need same data or input.
  • Sequential Cohesion : operations on same data in significant order; output from one function is input to next (pipeline).
  • Informational Cohesion: a module performs a number of actions, each with its own entry point, with independent code for each action, all performed on the same data structure.
  • Functional Cohesion: all elements contribute to a single, well-defined task, i.e. a function that performs exactly one operation.

Following are the types of Coupling observed during design phase:

  • Content/Pathological Coupling: (worst) When a module uses/alters data in another .
  • Control Coupling: 2 modules communicating with a control flag (first tells second what to do via flag).
  • Common/Global-data Coupling: 2 modules communicating via global data.
  • Stamp/Data-structure Coupling: Communicating via a data structure passed as a parameter. The data structure holds more information than the recipient needs.
  • Data Coupling: (best) Communicating via parameter passing. The parameters passed are only those that the recipient needs.
  • No data coupling: independent modules.

More information at: http://c2.com/cgi/wiki?CouplingAndCohesion

Monday, August 18, 2008

How to program Read,Write parallel port in C#?

Introduction

The Parallel Port is the most commonly used port for interfacing homemade projects. Parallel ports are easy to program and faster compared to the serial ports. But main disadvantage is it needs more number of transmission lines. Because of this reason parallel ports are not used in long distance communications. This port allows the input of up to 9 bits or the output of 12 bits at any one given time, thus requiring minimal external circuitry to implement many simpler tasks. The port is composed of 4 control lines, 5 status lines and 8 data lines. It's found commonly on the back of your PC as a D-Type 25 Pin female connector.

What is a parallel port?
A port contains a set of signal lines that the CPU sends or receives data with other components. We use ports to communicate via modem, printer, keyboard, mouse and other such devices. In signaling, open signals are "1" and close signals are "0" so it is like binary system. A parallel port sends 8 bits and receives 5 bits at a time.

The parallel port comprises of 3 different ports the Data Port, the Status Port and the Control Port. These ports are distributed among the 25 PIN of the port. The data port ranges from PIN 2 to PIN 9 i.e. 8 PIN indicating a byte. The Status port ranges from PIN 10 to PIN 13 and the PIN 15 is also a part of the status port. The Control port comprises of PINs 1, 14, 16 and 17. The detail of these PINs and their functions is given below:
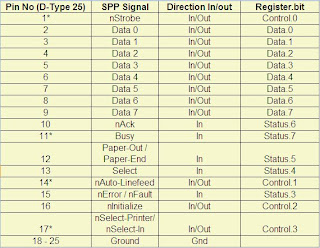
* Pins with * symbol in this table are hardware inverted. That means, If a pin has a 'low' ie. 0V, Corresponding bit in the register will have value 1.
Signals with prefix 'n' are active low. Normally these pins will have low value. When it needs to send some indication, it will become high. For example, normally nStrobe will be high, when the data is placed in the port, computer makes that pin low.
Normally, data, control and status registers will have following addresses. We need these addresses in programming later.

By default, data port is output port. To enable the bidirectional property of the port, we need to set the bit 5 of control register.
To know the details of parallel ports available in your computer, follow this procedure:
1. Right click on My Computer, go to "Properties".
2. Select the tab Hardware, Click Device manager.
3. You will get a tree structure of devices; in that Expand "Ports (Com1 &LPT)".
4. Double Click on the ECP Printer Port (LPT1) or any other LPT port if available.
5. You will get details of LPT port. Make sure that "Use this Port (enable)" is selected.
6. Select tab recourses. In that you will get the address range of port.

Parallel Port Interface Projects
1. Running LED lights.
2. Controlling a remote Car using the computer.
3. Controlling home appliances such as lights, fan, TV etc.
4. Any other gadget that you want to control.

Programming Parallel Port in C#
Till today we use to control the Parallel port using the “Turbo C”, which is easy to code and at the same time powerful to control the parallel port. C lacks the fancy user interface that most of the users are attracted towards. Even in this article we will be using the Console application, you can use the code and create a Windows Forms application for a fancy UI.

I have used an assembly inpout32.dll for interfacing with parallel port. This assembly provides easy access to the interfacing API’s. You can download the assembly from here.

If you are coding in Turbo C, you will end up using the functions outportb() and inportb() from the Stdio.h and IO.h library files.

Create a Console application project using Visual Studio. Add a file PortAccessAPI.cs and add the following code to this file:
// References
using System;
using System.Runtime.InteropServices;

/// <summary>
/// Class to access the Port API's from the inpout32.dll.
/// </summary>
public class PortAccessAPI
{
/// <summary>
/// This method will be used to send the data out to the parallel port.
/// </summary>
/// <param name="adress">Address of the port to which the data needs to be sent.</param>
/// <param name="value">Data that need to send out.</param>
[DllImport("inpout32.dll", EntryPoint="Out32")]
public static extern void Output(int address, int value);

/// <summary>
/// This method will be used to receive any data from the parallel port.
/// </summary>
/// <param name="address">Address of the port from which the data should be received.</param>
/// <returns>Returns Integer read from the given port.</returns>
[DllImport("inpout32.dll", EntryPoint = "Inp32")]
public static extern int Input(int address);
}
The Output function used in the above class will send the data out to the required port. The first parameter i.e. address, indicates the address of the port on which the data needs to be sent. The second parameter i.e. value, indicated the value (as integer) that needs to be sent to the port. In actual the value will be sent as binary on the port and hence an equivalent integer value needs to be computed before invoking this method.

Now in the Program.cs which is the entry point for the Console application, the following code will go in the Main method:

int address = 888;
int value = 24;
PortAccessAPI.Output(adress, value);

Here the address 888 as int is actually 0x378 as Hex, which is the data port of the parallel port.
To reset the data that is sent on the data port, you need to invoke the Output method with a value 0x00 i.e.0 as shown below:

int address = 888;
PortAccessAPI.Output(adress, 0);

This was all about writing data to the parallel port; now let’s see how we can read data from the parallel port. In the file PortAccessAPI.cs we have declared a function “Input”, this will be used to read the parallel port. This function takes a parameter “address”, this is the address of the parallel port that we want to read. This method will return an integer as the data that is read from the requested port. The code will look like:

int address = 888;
int value;
value = PortAccessAPI.Input(adress);

The variable “value” will contain the data that is read from the parallel port 0x378.

References
1. How Inpout32.dll works?
2. Inpout32.dll for Windows 98/NT/2000/XP.

Conclusion
Using this simple technique of read/write we can create innovative gadgets that can be controlled using the computer...

Hope this helps you !
Your comments are always welcome!

Sunday, August 17, 2008

How to Read an Excel in C#?

This article will help you understand reading an excel file in C#. This is often required when developing applications. Create an excel file named "Test.xls" in the C Drive. The sample excel file will look like:
For interacting with an excel file you will have to include the following COM assemblies:

  • Microsoft Excel 12.0 Object Library
  • Microsoft Office 12.0 Object Library

Following code will be used to read the excel file and display the values in a Console application:


// Add Reference
using System;
using Excel = Microsoft.Office.Interop.Excel;
using Microsoft.Office.Core;
using Microsoft.Office.Interop.Excel;

namespace ReadExcel
{
/// <summary>
/// This class will be used to read the excel and
/// display it in a console.
/// </summary>
class ReadExcelApplication
{
/// <summary>
/// The main entry point for the application.
/// </summary>
[STAThread]
static void Main(string[] args)
{
// Path for the test excel application
string Path = @"c:\test.xls";
// Initialize the Excel Application class
Excel.ApplicationClass app = new ApplicationClass();
// Create the workbook object by opening the excel file.
Excel.Workbook workBook = app.Workbooks.Open(Path,
0,
true,
5,
"",
"",
true,
Excel.XlPlatform.xlWindows,
"\t",
false,
false,
0,
true,
1,
0);
// Get the active worksheet using sheet name or active sheet
Excel.Worksheet workSheet = (Excel.Worksheet)workBook.ActiveSheet;

// This row,column index should be changed as per your need.
// i.e. which cell in the excel you are interesting to read.
int index = 1;
object rowIndex = 1;
object colIndex1 = 1;
object colIndex2 = 2;

try
{
while (((Excel.Range)workSheet.Cells[rowIndex, colIndex1]).Value2 != null)
{
// Read the Cells to get the required value.
string firstName = ((Excel.Range)workSheet.Cells[rowIndex, colIndex1]).Value2.ToString();
string lastName = ((Excel.Range)workSheet.Cells[rowIndex, colIndex2]).Value2.ToString();
Console.WriteLine("Name : {0},{1} ", firstName, lastName);
index++;
rowIndex = index;
}
}
catch (Exception ex)
{
// Log the exception and quit...
app.Quit();
Console.WriteLine(ex.Message);
}
}

}
}

Hope this helps! Your comments are always welcome!

Wednesday, August 13, 2008

App_Offline.htm - How to Redirect user to "Down for Maintenance" page in ASP.NET ?

Usually there arises a scenario when we want to upgrade our production site to a new release, and want the users to be redirected to the “Down for Maintenance” page.

The best way to implement this is using the app_offline.htm file. ASP.NET 2.0 has provided a fantastic functionality using which the users will automatically be redirected to the “Down for Maintenence” page. Just add a HTML file named “app_offline.htm” to the root directory of your web site. Adding this file will clear the server cache. When ASP.NET sees the app_offline.htm file, it will shut-down the app-domain for the application (and not restart it for requests) and instead send back the contents of the app_offline.htm file in response to all new dynamic requests for the application.

Please take a note that the size of the file should be more that 512 bytes to be displayed. If the size of the file is less that 512 bytes, then manually IE Browser settings need to be changed. The "Show Friendly Http Errors" check box from the Tools->Internet Options->Advanced tab within IE needs to be unchecked. If this check-box is not unchecked and the app_offline.htm file size is less that 512 bytes, then the IE “Page cannot be displayed” message will be shown.

To start the web site again, just remove this file from the root folder of your web site. This will trigger the asp.net engine to cache all the page contents and display the pages. This has really made life simple :)

Hope this helps! Your comments are always welcome!

Saturday, August 9, 2008

What is Obsessive-Compulsive Disorder (OCD)?

Obsessive-Compulsive Disorder (OCD), is an anxiety disorder characterised by unwanted or intrusive thoughts(obsessions) which leads to repetitive behaviors or mental acts (compulsions)that the person feels driven to perform in response to an obsession to get relieved from anxiety.


For example:
If people are obsessed with germs or dirt, they may develop a compulsion to wash their hands over and over again repeatedly upto the level of distress.
Many people have doubt that the door is locked or not; they may develop a compulsion to check repeatedly if it is locked or not.


These are some situations encounterd by normal people also but the difference is that people with OCD perform their rituals several times even though doing so interferes with daily life till they feel the repetition distressing.

Friday, August 8, 2008

What is Delusion?

A delusion is a belief that is clearly false (non bizarre) ;due to abnormality in the affected person's content of thought. The false belief is not due to person’s cultural or religious background or his or her level of intelligence. It is the degree to which the person is convinced that the belief is true. A person with a delusion will hold firmly to the belief regardless of contrary evidence. Some delusions are:

Delusion of control: This is a false belief that another person, group of people, or external force controls one's thoughts, feelings, impulses, or behavior. A person may describe, for instance, the experience that aliens actually make him or her move in certain ways and that the person affected has no control over the bodily movements.

Delusional jealousy: A person with this delusion falsely believes that his or her spouse or lover is having an affair. This delusion stems from pathological jealousy and the person often gathers "evidence" and confronts the spouse about the nonexistent affair.

Delusion of guilt or sin: This is a false feeling of remorse or guilt of delusional intensity. A person may, for example, believe that he or she has committed some horrible crime and should be punished severely. Another example is a person who is convinced that he or she is responsible for some disaster (such as fire, flood, or earthquake) with which there can be no possible connection.

Delusion of mind being read: This is a false belief that other people can know one's thoughts. This is different from thought broadcasting in that the person does not believe that his or her thoughts are heard aloud.

There is a subtle difference between illusion and delusion.

Thursday, August 7, 2008

ASP.NET Page Life Cycle

When an ASP.NET page is requested by the client-browser, the page goes through a life cycle in which it performs a series of processing steps. These include initialization, instantiating controls, restoring and maintaining state, running event handler code, and rendering. Moreover, for custom controls, understanding the page life cycle is very important in order to correctly initialize controls, populate control properties with view-state data, and run any control behavior code.

Page Life-cycle Stages
When a web page is requested it goes through a number of stages to get completely built. In addition to the page life-cycle stages, there are application stages that occur before and after a request to the page. Following are the stages under which a page goes before getting rendered to the client.

Page Request: The page request occurs before the page life cycle begins. When the page is requested by a user, ASP.NET determines whether the page needs to be parsed and compiled or whether a cached version of the page can be sent in response without running the page.

Start: In this step, the HTTP properties such as Request and Response are set. At this stage, the page also determines whether the request is a postback or a new request and sets the
IsPostBack property. The page's UICulture property is also set.

Page initialization: During page initialization, controls on the page are available and each control's UniqueID property is set. Any themes are also applied to the page. For the page post backs the controls values are not set in this stage from the view state.

Load: During load stage, if the current request is a postback, control properties are loaded with information recovered from view state and control state.

Validation: The Validate method of all validator controls is called, which sets the IsValid property of individual validator controls and of the page.
Postback event handling: If the request is a postback, any relevant event handlers are called.

Rendering: Before rendering, view state is saved for the page and all controls. During the rendering phase, the page calls the Render method for each control, providing a text writer that writes its output to the OutputStream of the page's Response property.

Unload: Unload is called after the page has been fully rendered, sent to the client, and is ready to be discarded. At this point, page properties such as Response and Request are unloaded and any cleanup is performed.

Life-cycle Events
At each stage of the page life cycle, the page raises certain events that can be used for custom coding. For control events, the event handlers must be bound to the enets. The following lists the page life-cycle events:
1. PreInit
2. Init
3. InitComplete
4. PreLoad
5. Load
6. Control events
7. LoadComplete
8. PreRender
9. SaveStateComplete
10. Render
11. Unload

Wednesday, August 6, 2008

How to Read/Write registry in C#?

Reading and writing to a registry is a routine task that an application developer has to perform using the C# code. Here is a handy way to read/write Windows registry using the C# code.

Required namespace:


using Microsoft.Win32;

Simple Way to Read/Write Registry:


public string GetRegistryValue(string key)
{
return Convert.ToString(Registry.GetValue
(@"HKEY_CURRENT_USER\Software\Yahoo\Common", "Sandy", "OLD"));
}

public void SetRegistryValue()
{
Registry.SetValue(@"HKEY_CURRENT_USER\Software\Yahoo\Common", "Sandy", NEW");
}

The above given is a simple method for accessing the registry. More complex class can be written to leverage advance registry functionality.